The Crags of Langstrath
TWO Wainwright circular walk: Eagle Crag, Sergeant's Crag
Walk Rating:⭐⭐⭐⭐
Time: 4 - 5 hours
Parking: in Stonethwaite, or on the roadside leading to it (limited spaces), or, in the high season, fee-paying by Borrowdale Primary School.
 |
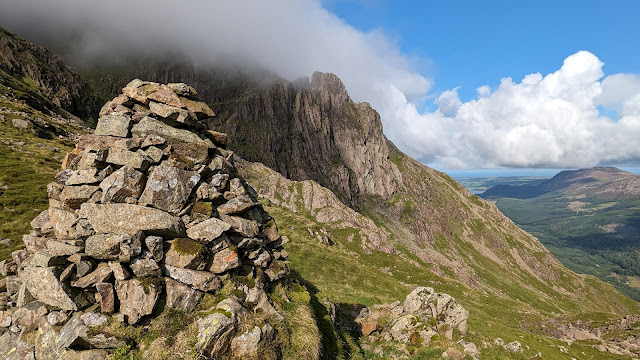
| Eagle Crag and Sergeant's Crag at the start of the walk |
Langstrath is a wild, isolated valley running north from the high fells towards Borrowdale. A beautiful hike can be made along the valley beside the meandering Langstrath Beck, which sometimes collects in deep pools such as Tray Dub and Blackmoss Pot, perfect spots for wild swimming.
To its east, high above the northern end of the valley, stand the two 'Wainwright' fells of Eagle Crag and Sergeant's Crag. A walk up to the peaks of these two fells, then down into Langstrath, before returning along the valley floor, makes for a memorable walk, with many fine views, as set out below (some of the route is not on clearly defined paths but, nevertheless, should be easy to follow):
 |
| Strava estimates a walking distance of around 13km |
1. Start at the red phone box by the parking places in the middle of Stonethwaite. Go along the path to the side of the house to the left, towards the bridge crossing the Stonethwaite Beck.
 |
| Start out by the side of the house towards the bridge |
2. Cross over the bridge. Go through a gate and turn right, through another gate, onto the stony track, signposted towards Greenup Edge.
 |
| Follow the track in the direction of Greenup Edge |
3. The old track is easy to follow as it makes its way up the valley, between stone walls. After rain it can become very wet in places and it's worth making the most of opportunities to walk on the grass to your left, rather than always on the track itself.
 |
| Follow the clear track towards Eagle Crag |
4. Sergeant's Crag and Eagle Crag can both be seen up to your right but there is little from here to indicate the full extent of the valley of Langstrath running underneath them.
 |
| Eagle Crag, with Sergeant's Crag behind |
5. After the confluence of the Langstrath Beck and Greenup Gill, the main path heads up the hillside above the gill. Below, to the right, another path leads down to a footbridge. You now have a choice of routes to the top of Eagle Crag - Wainwright's more spectacular but energetic 'Route A', or the less well-worn 'Route B' that first uses the track towards Greenup Edge to gain more height, also allowing you to visit the Chandravadan Parekh memorial stone.
 |
| The footbridge to be crossed for 'Route A'. |
Eagle Crag Route A
6A. For 'Route A', cross the footbridge, walk up the far bank but then leave the main path that continues into the Langstrath valley, instead crossing a stile into the often boggy field to your left.
 |
| Cross the stile into the field on the left |
7A. Cross the field, keeping to the left, close to the trees, until you reach a gate at the lower end of the stone wall, above the beck. Go through it and continue on towards the broken wall running up to the crag in the distance.
 |
| Go through the gateway and on to the next, broken, wall |
8A. The most obvious path continues above the riverbank until it reaches the bottom of the broken wall. If you take this route, go up across the broken wall and, after a little scramble up the steep turf, follow the broken wall all the way up the steep hillside.
 |
| Scramble through the broken wall |
9A. Although more obvious when seen from the 'Route B' path, there are also higher paths that you can take from the gate in the first stone wall, joining the broken wall further up the hillside. These paths can, however, be choked by bracken.
 |
| "Route A" as seen from the "Route B" path |
10A. Whichever route you have taken, you will still end up with a steep climb alongside the broken wall, up the muddy steps cut into the turf by previous walkers, until you eventually near the top of the wall as it meets the outcrop of Bleak How. The route, which is well-worn enough to be easily followed, then turns left, away from the broken wall, up towards the grassy col beneath the rocky ledges of Eagle Crag above you.
 |
| The steep climb alongside the broken wall |
11A. It climbs up to another wall where, beneath the crag, a jumble of fenceposts and wire now stands where, according to the Wainwright Guide, was once a stile. Walk up across the turf, between the crag and the fenceposts, to the grassy terrace above. The views down to both Langstrath and towards Borrowdale will show you how far up you have already climbed!
 |
| Langstrath from the terrace beneath the 'gully' |
12A. This terrace could appear to be a dead-end but the route now heads directly upwards, to the left from where you first arrived, via a short gully. It does require a few yards of scrambling with hands and feet until you reach the tree above.
 |
| Looking upwards at the gully you must ascend |
 |
| Looking back down the gully |
13A. The path now heads off to the right, across the heathery terraces above the northern end of Langstrath. However, it's worth first taking a detour to the left to look down into Greenup Gill, far below, under the steep walls of Eagle Crag.
 |
| Looking down into Greenup Gill |
14A. The next part of the route is the trickiest part of the ascent and definitely not one to try in bad weather. The path winds around through the undergrowth, sometimes zig-zagging back on itself sharply, working its way around the top of Heron Crag, to the west of the fell. Be patient and keep looking for an obvious, if thin, path, rather than blazing your own trail.

 |
| The views from the path above Heron Crag |
15A. There's one point, however, where a muddy trail could lead you astray as it heads right, to a dangerous dead-end, high above Langstrath. It suggests many walkers originally walk past the rocky scramble that they should have taken to their left, some yards previously. So, tread carefully, and look out for the scramble up these rocks where, again, hands and feet are needed.
 |
| The rocky scramble that must not be missed! |
16A. Once you have made it up this scramble, you will be successfully on your way to the top. However, there's still a few final twists and turns to be spotted, before the route eventually brings you out just to the south of the summit.
 |
| A simplified view of "Route A" |
Eagle Crag Route B
7B. For 'Route B', the directions are far simpler. Instead of crossing the footbridge, continue on the stony track up the eastern bank of Greenup Gill, which descends from the fells through falls and pools besides you.
 |
| Greenup Gill |
8B. The track has become quite worn in places and there will be some loose stones underfoot, as well as fords to be crossed, with the risk of water in your boots when the streams flowing off Ullscarf are full.
 |
| Crossing one of the many streams |
9B. But the valley offers beautiful views as it climbs the valley beneath Eagle Crag, with Herwdwick sheep on the hillsides to keep you, and other walkers, company.
 |
| Walk up the beautiful valley beneath Eagle Crag |
10B. Keep on climbing up the track, ascending the valley to a point where Eagle Crag no longer looks down with such sharp cliffs but, instead, reveals the grassier slopes to its rear.
 |
| The grassy slopes to the rear of Eagle Crag |
11B. You need to keep a look out for the walls of an old round sheepfold on a small island below you in the gill to your right. This is where you leave the track and search out the best way to cross over to the grass on the other side.
 |
| The sheepfold seen from above, higher up on "Route B" |
12B. The way the gill has divided into different small streams at this point means that you need to make two or three crossings but none that will prove too wide. Choosing the right rocks a few yards to the south of the sheepfold should make sure you make it successfully across without too much difficulty.
 |
| Crossing the gill just to the south of the sheepfold |
13B. Once across Greenup Gill, unlike 'Route A', don't expect to find an obvious path guiding you to the summit! It's up to you to pick your best way up the hillside. I would advise first gaining height across the grass in a roughly south-west direction, towards Sergeant's Crag, rather than heading directly towards Eagle Crag. This helps you avoid some small crags and the worst of the marshy ground around the small streams heading down the hillside.
 |
| Head up the hillside to the south-west at first |
14B. Once you've gained some height, turn more towards the north-west, now heading up towards the top of Eagle Crag. You may find more of a semblance of a path (or perhaps just a sheep track!) in the grass as you reach the top of the ridge.
 |
| Looking back along the route up from the valley |
15B. Look for a ladder stile that crosses the wall on the ridge ahead of you. The stile stands just to the left of where this wall makes a corner with another wall heading west, underneath the top of Eagle Crag, over to your right.
 |
| Aim for the stile in the corner of the walls above you |
16B. Cross the ladder stile, turn right and then almost immediately climb up a steep step that takes the path up to reach the slab of rock that marks the summit of Eagle Crag itself (1706').
 |
| On the summit of Eagle Crag |
17. From the top of Eagle Crag, there are good views down into Langstrath and along the ridge to your next destination, Sergeant's Crag.
 |
| Looking south towards Sergeant's Crag |
18. To continue to this next fell, follow the ridge path down a steep step, past the bottom of the ladder stile crossed if ascending via "Route B", and continue on the clear path along the ridge to the west of the stone wall that links the two fells.
 |
| Walk past the stile and alongside the wall to the next summit |
19. It's an easy half-mile walk, on a clear path that veers away from the wall as it ascends to the summit of Sergeant's Crag (1873'). A small cairn sits on its top.

 |
| On the summit of Sergeant's Crag |
20. To descend from Sergeant's Crag into Langstrath, first leave the summit to the south, crossing the ridge wall via a ladder stile and heading south along the ridge. However, do not head up the slopes that rise in front of you to the south-east, towards High Raise. Instead, make your way to the right, south across the top of Langstrath, looking down over Bull Crag and Brown Crag. There will be no clear path, this section of the route being very much one that needs you to pick your own way across the hillsides.
 |
| On the way south from Sergeant's Crag |
 |
| Looking across Langstrath towards Glaramara |
21. Once beyond the rocky outcrops of Brown Crag, you can start to descend safely, but steeply, down the grassy slopes, alongside streams that are also flowing down into the valley from the fells.
 |
| Descending the grassy slopes into the valley |
22. To your left, you should be able to pick out the track that climbs up to Stake Pass, on its way to Langdale. Below you, look out for a wooden footbridge crossing the Langstrath Beck and pick your route across the final hummocks to reach it.
 |
| Make your way down to this footbridge |
 |
| Tray Dub |
23. Unlike the 'self-guided' route down into the valley, the route is now very obvious. It follows a clear track that takes you northwards, along the western side of the beck, also passing close to 'Swan Dub'.
 |
| In the valley of Langstrath |
24. As you walk on, nearly below the peak of Sergeant's Crag, the path passes by another small gorge, where the beck forms the even deeper pool of Blackmoss Pot, a well-known spot for wild swimming.
 |
| Blackmoss Pot |
 |
| Continue under the peak of Eagle Crag |
 |
| The waterfalls beneath Eagle Crag |
27. Complete the route on either the lane or the path through the fields by the Stonethwaite campsite, back to the village and the start of the route.
 |
| The memorial plaque to Chandravadan Parekh |
Worth knowing: If you look carefully on the Strava map for the area, you will see an icon marking the position of the "Chandravadan Parekh Monument". This can be found only about fifty yards from the well-worn path up Greenup Gill ("Route B" above), and about 150 yards north of the round sheepfold on the island in the gill (see 11B above). Because it lies against the eastern side of a small rock, it is hidden from the path, and so most walkers are unaware of its existence.
 |
| The Strava map showing the position of the 'monument' |
The 'monument' is not mentioned in the revised Wainwright Guide. My information is taken, with thanks, from a geocache site that explains its origins in greater detail. It is is, in fact, a flat inscribed stone marking a tragic, but salutary, event that took place in March 1968. It was put up in memory of an Asian schoolboy, part of a school party being taken on to Ullscarf and High Raise by their teacher, who sadly died from exposure. Realising that the boy was unwell, the teacher had tried to bring the party to safety down the Greenup Gill path but to no avail.
 |
| The inscription |
The inscription explains that the stone was left in the valley "in memory of our dear friend Chandravadan Parekh aged 15 years who came down with us from High Raise and died of exposure near this place on March 18th 1968. Our attempts to revive him were unsuccessful and by his shattering death he has made us forever humbler and more gentle in our lives".
 |
| The rock supporting the plaque is in the foreground |
If one tragedy wasn't enough for this little valley, then another smaller plaque can be found further down towards Seathwaite, this time on a rock right by the main path. This plaque commemorates Gordon Hallworth, another walker who failed to return alive from the fells. His story is told in this blogpost.
 |
| The small plaque on a rock by the path under Eagle Crag |
 |
| In enduring memory of Gordon Hallworth |
As the blogpost explains, the bridge crossed at the start of "Route A" above was commissioned in Gordon's memory by his father to provide a safe crossing of the gill at this point.