FOUR Wainwright circular walk: Seathwaite Fell, Allen Crags, Glaramara, Rosthwaite Fell
Walk Rating:⭐⭐⭐⭐
Time: 6 - 7 hours
Parking: At the roadside on the minor road from Seatoller to Seathwaite, making sure to leave room for emergency vehicles. In high season, paid parking can also be found at the end of this road, at Seathwaite Farm. Alternatively, take a bus to Seatoller from Keswick and start the walk from there.
 |
| Glaramara from Brown Crag on the other side of Langstrath |
The ridge running north from Esk Hause to Borrowdale offers walkers a beautiful hike across the summits of Allen Crags, Glaramara and Rosthwaite Fell. In fact, the last two fells consist of many more than one peak because the ridge consists of a series of crags and tarn-filled depressions. When you add in the scenery created by the deep valley of Combe Gill that cuts into the ridge to the north of Glaramara, the walk offers some fine and varied views.
 |
| Glaramara and Allen Crags from (the 'higher') Esk Hause |
The route described provides a circular route from Seathwaite, with an ascent of the often by-passed Seathwaite Fell included as an additional summit at the start of the walk. Walkers will however, need to have some confidence in route-finding as it is largely on paths that are less frequently walked than many of the more well-known routes in this part of Lakeland. To help give you that confidence, this is a longer post than usual, with a range of photos that will hopefully assist you in finding your way across the fells.
 |
| Strava estimates a walking distance of 18km |
Seathwaite Fell
1) To avoid too much road walking, rather than sticking to the tarmac all the way to Seathwaite Farm, you can take a path that runs alongside the far bank of the River Derwent. When you reach the path that heads west from Seathwaite towards the waterfalls of Sourmilk Gill, for this route you should instead turn east, back over the river, on a path that finishes by going through an arch in the farm buildings.
 |
| The path alongside the river |
2) Turn right and join the track that runs through the middle of the farm. Walk north, along the clear path leading towards the head of the valley. Seathwaite Fell rises on the right of the ring of fells ahead of you.
 |
| Seathwaite Fell rises to the right of your path |
3) When you reach the arched stone Stockley Bridge, unless you want to leave out the ascent of Seathwaite Fell and head straight to Allen Crags, you should now leave the path that continues upwards towards Esk Hause and instead cross the bridge over Grains Gill.
 |
| Cross over Stockley Bridge |
4) Follow the clear path that heads from the bridge uphill towards Sty Head, skirting around the northern side of Seathwaite Fell. The path climbs up the valley above Styhead Gill with Seathwaite Fell to your left and Base Brown to your right. Look for a cairn near to where a small stream descending from Seathwaite Fell crosses the main path. At this point, turn left to climb the steep grassy slope up towards the gully above you on the top of the fell.
 |
| Leave the main path to climb up the grassy slope |
5) It's a steep climb and (not for the last time in your walk today!) the path is fairly sketchy. However, you will keep coming across the occasional small cairn and steps in the turf that can help direct you to the top of the fell.
 |
| Glaramara to your left ... |
 |
| ... and Great Gable to your right as you climb the fellside |
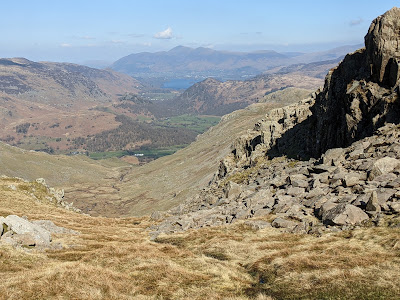
6) When you eventually reach the top of the climb, a cairn on the outcrop that marks the official summit (1970') isn't much further ahead. There's a good view down the Seathwaite valley and west to Great Gable.
 |
| The view down the Seathwaite valley ... |
 |
| ... and of Great Gable from the 'official summit' cairn |
7) From the cairn, you will see that the top of the fell consists of a series of small summits, some actually higher than the 'official summit'. A walk over to the cairned outcrop to the south-west will take you over 2000' and also provides a view down over Wasdale Head. To continue across the fell to Sprinkling Tarn, make your way south between the various outcrops and small tarns, heading in the general direction of the sheer north face of Great End.
 |
| Make your way south towards Great End |
8) To your left, you can look across the valley of Grains Gill towards Allen Crags and Glaramara, the ridge that provides your return route to Seathwaite.
 |
Glaramara and Allen Crags to the east
|
9) Whatever the exact route you take, you will come out above Sprinkling Tarn, sitting underneath the north face of Great End.
 |
Sprinkling Tarn, underneath Great End
|
10) The clearest path skirts the western banks of the tarn but you can also take a route around its eastern side as well.
 |
| Walk around the banks of Sprinkling Tarn |
11) Either way, on the other side of the tarn you will then reach the very obvious path that runs underneath Great End, from Sty Head to Esk Hause. From Esk Hause, you will return over Allen Crags and Glaramara back towards Borrowdale.
 |
| View from Windy Gap between Great and Green Gables |
 |
On the southern shore of Sprinkling Tarn
|
Allen Crags
12) So, from Sprinkling Tarn, turn left and follow the path up towards the 'lower' Esk Hause. If you by-passed Seathwaite Fell, the path continuing up the valley of Grains Gill from Stockley Bridge also joins the main path as it crosses the head of that valley here.
 |
| Sprinking Tarn from the path to Esk Hause |
13) The path ascends by the side of Ruddy Gill towards the col above. Don't head up to the right on another path heading up to the 'higher' Esk Hause. When you reach the top of the 'lower' col, a cruciform wind shelter stands just above it on the right.
 |
| The path to Allen Crags behind the cruciform wind shelter |
14) At this major junction of walkers' routes, turn left, to climb northwards up the rocky slope of Allen Crags. It's only a short walk to the summit cairn (2572').
 |
| The Glaramara ridge from the top of Allen Crags |
15) There is a good view westwards, over Sprinkling Tarn, towards Great Gable.
 |
| Sprinkling Tarn from the top of Allen Crags |
Glaramara
16) Looking north from the top of Allen Crags, the ridge extends away to the top of Glaramara. However, to reach that summit, your route first falls and rises several times along the undulating ridge. The path runs largely on the western, Seathwaite Fell, side of the ridge so, if you lose sight of an obvious path, that is where to look for it.
 |
| The path largely runs to the west side of the ridge |
 |
| Great Gable over Seathwaite Fell as you descend Allen Crags |
17) Walking down the north slope of Allen Crags, a depression containing 'High House Tarn" - only small, but nevertheless a body of water big enough to be named - is soon reached. Actually, the most photogenic tarn on the ridge is a smaller one just to the south of High House Tarn, nestled amongst rocky outcrops.
 |
| High House Tarn |
 |
| The small tarn to the south of High House Tarn |
18) The path continues up a rocky ascent of the stony rise ahead. Behind, there are good views towards Great End and Great Gable. On top of the rise, there are good views west over Seathwaite Fell.
 |
| Looking behind towards Great End and Great Gable |
 |
| Seathwaite Fell with Green and Great Gables beyond |
19) The next depression contains more of a bog than a tarn. The path crossing the dip is obvious, climbing to another rocky ascent on its far side.
 |
Cross this depression on the clear path
|
20) Instead of heading towards the top of the ridge towards Glaramara at this point, it's worth veering to the west to a point marked on the OS map as "Looking Steads". As you might expect, the crags on the west side of the ridge at this point provide a good viewpoint.
 |
| Looking westwards from 'Looking Steads' |
21) Now continue the short walk north-east from "Looking Steads" up the final rise to the cairned summits of Glaramara itself (2569').
 |
The final summit of Glaramara from 'Looking Steads'
|
22) The first summit outcrop you will reach is the one to the south-west. It provides a great view north towards Borrowdale and Skiddaw, and south-west towards Scafell Pike.
 |
| Views from the south-west summit cairn on Glaramara |
23) The second summit lies a couple of hundred metres to the north-east.
 |
| The north-east summit from the south-west summit |
24) This summit also has excellent views plus, to provide some respite on a day when the weather isn't as good as you might like, also includes a wind shelter.
 |
| On the north-east summit of Glaramara |
Rosthwaite Fell
The onward route from Glaramara to the final 'Bessyboot' summit of Rosthwaite Fell requires finding your way across a fascinating rocky ridge. However, the path is, at best, intermittent. At times, you will just have to work out the best route for yourself. I have therefore included photos and directions that show you one good route that can certainly be followed safely - but you may decide on other variations too!
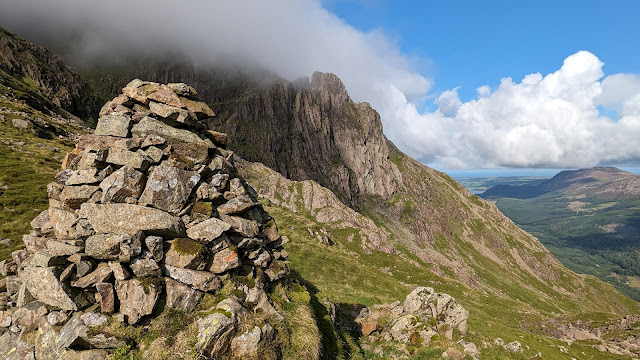
25) From the north-east summit of Glaramara, a short walk north will bring you out above a steep drop over a depression dotted with small tarns.
 |
| The depression beneath Glaramara - with Combe Head behind |
26) The path heads to a high rock-step - Wainwright estimates it is 20 feet in height - that needs to be carefully descended in order to reach the depression below.
 |
| Looking back at the rock-step once safely at its bottom |
27) Below the rock-step, a clear path continues northwards, taking walkers down to Borrowdale via Thornythwaite Fell. However, to head to Rosthwaite Fell, a different route must be taken. Where the path crosses a marshy area below the rock-step and then turns left, a much thinner path leaves to the right. This is the path to take.
 |
| Head right along the thinner path at this junction |
28) Bear right, making your way between the various small tarns. However, so as not to miss a good view, before reaching the last tarn, head up the small cairned rise in front of you. This is Combe Head, a good viewpoint down over Borrowdale.
 |
| Borrowdale from Combe Head |
 |
| Rosthwaite Fell from Combe Head |
29) Retrace your steps down to the tarns, but start to bear left, as if you were walking into Langstrath.
 |
| Glaramara on the way back down from Combe Head |
30) After passing the last of the small tarns, a thin path continues eastwards in a grassy dip headed in the direction of Sergeant's Crag, on the other side of Langstrath.
 |
| Walk eastwards along this grassy dip |
31) Another tarn-filled depression opens out below you. By veering right, then down the slope in the general direction of Pike o'Stickle, you can descend to it without difficulty.
 |
| Head down the slope in the direction of Pike o'Stickle |
 |
| The view towards 'Combe Door' as you walk down the slope |
 |
| Looking back at the descent from the depression below |
32) My preferred onward route continues eastwards, above the tarns, still heading towards Langstrath. However, an alternative route heads through the opening of 'Combe Door' to your left instead. So as to not completely miss out on this excellent viewpoint, it's definitely worth taking a slight detour below the tarns to at least look 'through the door' before returning to my preferred route above the tarns again.
 |
| Borrowdale through 'Combe Door' |
 |
| The onward route above the tarns towards Langstrath |
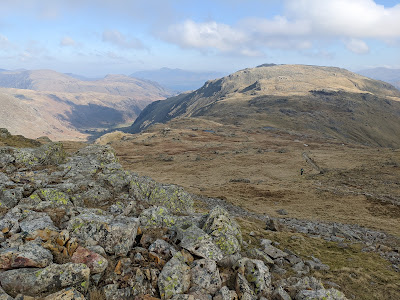
33) Following my route eastwards, as suggested, brings you down to the main ridge of Rosthwaite Fell. This runs northwards between the valley of Langstrath and that of Combe Gill, the valley seen through Combe Door.
 |
| The ridge of Rosthwaite Fell runs northwards ahead of you |
34) Choose a route that keeps you heading generally northwards, in the middle of the ridge. Occasionally you will come across traces of the old path but it's down to your judgement for most of the time.
 |
| Traces of the old path heading north towards Rosthwaite Cam |
35) Behind you, to your left, you will see Combe Head rising at the head of the valley of the Combe Gill. To your right, beyond the higher ground of the ridge, the fell falls away into Langstrath.
 |
| Combe Head to your left ... |
 |
| ... and Stake Pass leading out of Langstrath to your right |
36) The route rises over a higher outcrop and then drops through a gully into a further depression beyond it.
 |
| Climb over the middle of the next outcrop ... |
 |
| .. then descend to the next depression through a gully |
37) Looking left from the path as it crosses the lower ground below, you may be able to work out the roads leading to the Honister Mine on the side of Fleetwith Pike.
 |
| Fleetwith Pike and the Honister Pass to your left |
38) The next higher ground to be crossed is the ridge of Rosthwaite Cam. You can either take a path across the centre of the ridge or walk up the grassy gully on the left to visit the viewpoint on its west. From there you can look down over Combe Gill.
 |
| Raven Crag, above Combe Gill, from Rosthwaite Cam |
 |
| Looking west over Combe Gill from Rosthwaite Cam |
39) From Rosthwaite Cam you also get your first glimpse of 'Tarn at Leaves', the tarn nestled beneath your final summit destination, 'Bessyboot', standing at the northern end of the ridge of Rosthwaite Fell.
 |
| 'Bessyboot' and 'Tarn at Leaves' from Rosthwaite Cam |
40) The clearest path leading down towards Tarn at Leaves runs from the middle of the ridge of Rosthwaite Cam along another gully in the rocks.
 |
| A path leads down this gully towards Tarn at Leaves |
41) The path makes its way to a final group of grassy hummocks looking down over the western banks of the tarn. Bessyboot is the distinctive peak rising beyond.
 |
| Bessyboot rising beyond Tarn at Leaves |
42) Make your way down to the banks of Tarn at Leaves and then take the onward path climbing up to the top of Bessyboot. There are good views back over the tarn behind you as you ascend.
 |
| Bessyboot reflected in Tarn at Leaves |
 |
| Looking back over the tarn towards Rosthwaite Cam |
43) The summit of Bessyboot (1807') is marked by a small cairn. The views from here are still good, but you will have already visited better viewpoints on your hike along the ridge of Rosthwaite Fell.
 |
| The cairn summit on Bessyboot |
 |
| Looking back south to the rest of of Rosthwaite Fell |
Back to Seathwaite
44) It's now time to descend from Rosthwaite Fell. Although a shorter route can be taken on a steep path cutting down the fellside from just to the south of Bessyboot, the easiest descent is on a path that starts back at the south-west corner of Tarn at Leaves. From there, a path cuts down across the grass, heading north-west towards Seatoller.
 |
| Take the path descending from the south-west corner of Tarn at Leaves |
45) Sadly, the last path of the descent is a bit of a trial for tired legs. The path is steep, sometimes unclear, and, when you do find it, not in great condition. However, pick your way down the slope as best you can towards Combe Gill in the valley below.
 |
| Descending towards Seatoller |
 |
| A last look north towards Skiddaw |
46) The path goes through a stone wall then contours north above Combe Gill towards Seatoller. After crossing a few more stone walls, look for a path that leaves left towards a bridge that allows you to cross the gill. From there you can reach the main road leading towards Seatoller, and then left along the minor road towards Seathwaite to return to the start of your long day's walk.
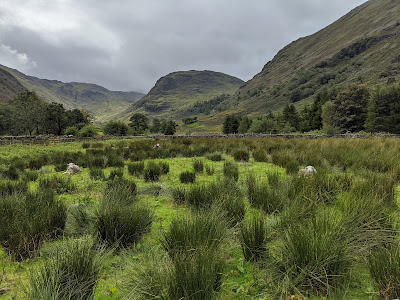 |
| A rainy sky over Seathwaite Fell |
Worth knowing: Many of the photos in this post contain the sunny skies that I like to include in my pictures of the Lake District. However, I still had to include at least some shots taken on greyer days! That's not really surprising when you consider the rainfall figures measured by the rain gauges on Seathwaite Fell. They have earned Seathwaite the dubious honour of being named "the wettest inhabited place in the United Kingdom".
A quick google search shows that there are other places that might argue with Seathwaite over its claim to fame but, undoubtedly, it's a place where a lot of rain can fall! Even though Storm Desmond in 2015 transferred the UK record for the highest rainfall in a 24-hour period from Seathwaite to other parts of Cumbria, the village still holds the records for the highest rainfall over both a 2-day and 3-day period, thanks to the rain that fell during the "extreme weather event" of November 2009. Those storms caused severe flooding in vulnerable areas across Cumbria.